Embedded Wizard Studio: AI Console
The AI Console integrates an AI assistant directly into Embedded Wizard Studio, enabling you to interact with an intelligent helper that can access documentation, analyze your project, and modify project contents according to your instructions. The AI assistant is powered by Anthropic's Claude models and provides context-aware assistance for GUI development tasks.
The AI Console window is by default hidden. When shown, it appears as a floating window above the Embedded Wizard Studio IDE:
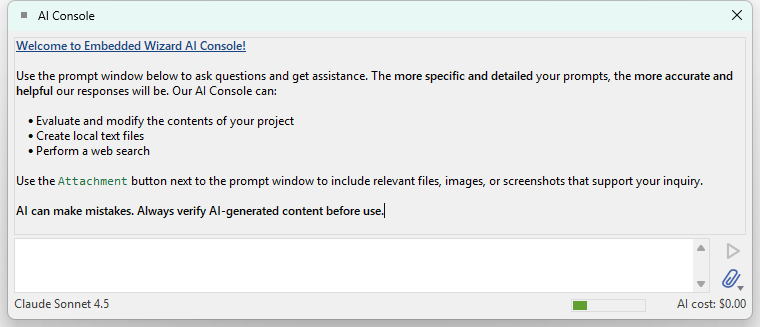
AI Console window with chat history, prompt area, and status bar
The AI Console provides several powerful capabilities:
★Direct access to your project structure and code
★Ability to read, modify, create, and delete project members
★Access to Mosaic framework documentation
★Understanding of Chora programming language syntax
★Web search for current information when needed
★Processing of attached files and screenshots
Early Access Feature: The AI Console is currently provided as an early access feature. It already offers powerful assistance for GUI development tasks, but the AI assistant can still make mistakes - for example, by generating incorrect code, misinterpreting requirements, or suggesting suboptimal solutions. We therefore recommend that you always review and test AI-generated changes before using them in production and keep regular backups of your project. We are convinced of the potential of AI-assisted GUI development and are actively working on further improving and extending this feature.
Show the AI Console
To display the AI Console window:
★Select the menu item .
★or use the keyboard shortcut AltShift0.
Using the described menu item or the shortcut while the AI Console is already visible causes the window to become focused only.
Before you can use the AI Console, you need to configure a valid Anthropic API key. See section Enter Anthropic API key for details.
Window structure
The AI Console window is divided into several distinct areas, each serving a specific purpose:
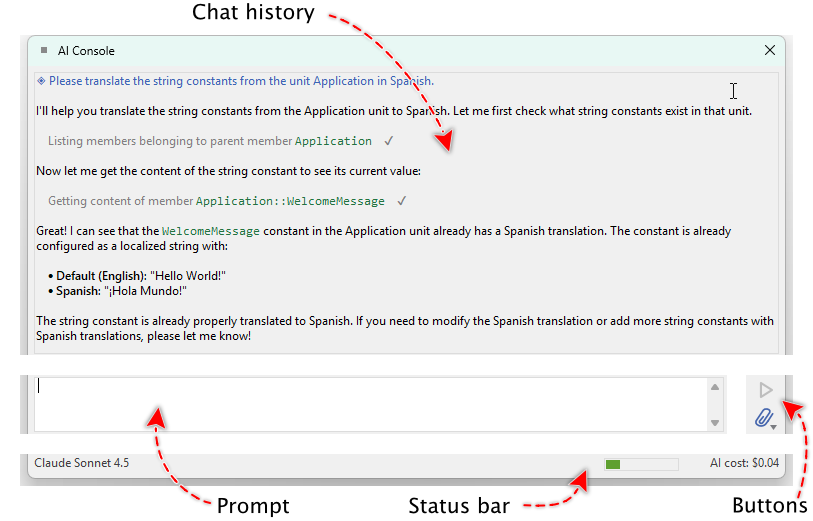
Overview of AI Console window areas: chat history, prompt input, attachment button, send button, and status bar
The main areas are:
★Chat history area - The upper area displays the conversation between you and the AI assistant. This area shows your prompts, AI responses, and information about tool operations performed by the AI.
★Prompt input area - The lower area contains an edit field where you enter your instructions and questions for the AI assistant.
★Attachment button - Located on the right side of the prompt area, this button opens a menu for managing file and screenshot attachments.
★Send/Stop button - Next to the attachment button, this button sends your prompt to the AI. While the AI is processing, the button changes to a stop button allowing you to abort the current request.
★Status bar - At the bottom of the window, the status bar displays the currently selected language model, estimated context window size, and accumulated costs for the conversation.
Entering prompts
To communicate with the AI assistant, you enter text in the prompt input area:
★Click in the prompt input field and type your question or instruction.
★Press Enter to send the prompt to the AI assistant.
If you need to create multi-line prompts:
★Press ShiftEnter to insert a line break without sending the prompt.
The AI assistant will process your request and display its response in the chat history area above. Depending on the complexity of your request, the AI may use various tools to access documentation, inspect your project, or modify project members.
TIP
Be specific and detailed in your prompts. The more context you provide, the better the AI can assist you. For example, instead of asking "Fix this error", explain what error you're encountering and what you've already tried.
Understanding the chat history
The chat history area displays the conversation using markdown formatting, making responses easy to read and understand:
★Your prompts appear with clear visual separation from AI responses.
★AI responses use proper formatting including bold text, code blocks, lists, and links.
★Tool operations are displayed with dedicated entries showing what action the AI performed and whether it succeeded or failed.
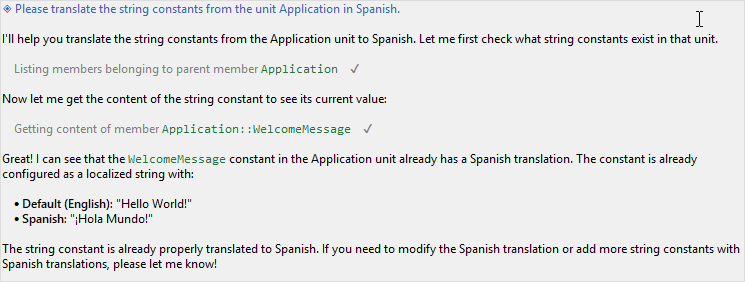
Chat history showing formatted AI response with tool operation entries
When the AI uses tools to accomplish your request, you'll see informational entries in the chat history. For example, if the AI lists project members, reads documentation, or modifies code, these operations are logged with their status (success or failure). This transparency helps you understand what the AI is doing to fulfill your request.
Status bar and cost information
The status bar at the bottom of the AI Console provides important information about your current session:
★Language model - Shows which Claude model is currently selected (e.g., "Claude Sonnet 4.5").
★Context window indicator - Displays a progress bar showing how much of the available context window is currently used.
★AI cost - Shows the accumulated costs since the beginning of the conversation.

Status bar displaying model name, context usage, and costs
To view detailed token usage information:
★Rest the mouse pointer over the cost text in the status bar.
A tooltip window appears showing detailed information about consumed input tokens, output tokens, cache write tokens, and cache read tokens, along with the calculated cost:
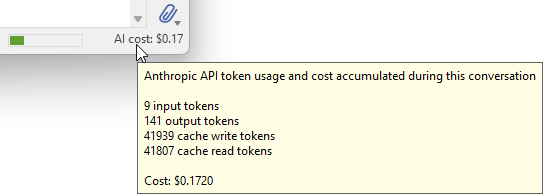
Tooltip showing detailed token usage and cost breakdown
The costs are calculated based on Anthropic's pricing for API usage known at building time of Embedded Wizard Studio 15. These costs represent actual usage and are charged to your Anthropic API account.
Context menu operations
The AI Console provides a context menu with various commands for managing your conversation and settings:
★Click with right mouse button inside the chat history area or the prompt input area to open the context menu.
★Alternatively, click with left mouse button on the status bar to open the context menu.
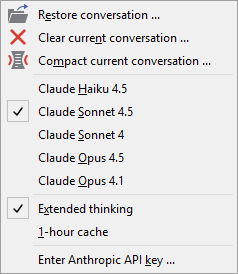
Context menu showing conversation management and model selection options
The context menu provides access to the following operations:
Restore conversation ...
If you want to continue a conversation from a previous session:
★In the context menu select the item .
This command allows you to load a conversation file that was automatically saved during previous sessions. Each prompt and AI response is stored automatically, enabling you to resume work at any time.
Clear current conversation ...
To start a completely new conversation and discard the current chat history:
★In the context menu select the item .
This operation removes all messages from the chat history as if you started a fresh conversation. The context window is cleared, and cost tracking resets.
Clearing the conversation removes all context the AI has about your previous requests. Use this when starting work on a completely different topic or when you want to reduce context window usage.
Compact current conversation ...
Over time, conversations can become lengthy and consume significant context window space. The compact operation helps manage this:
★In the context menu select the item .
When you compact a conversation, the AI assistant reprocesses the entire chat history and creates a condensed version that retains important information while removing older, irrelevant content. This operation:
★Reduces the size of the context window
★Preserves recent and relevant information
★Maintains continuity in the conversation
★Frees up space for new prompts and responses
The compacting process is also triggered automatically when the context window reaches approximately 90% of its available capacity. In this case, the AI Console performs the compacting operation transparently to ensure you can continue working without interruption.
TIP
If you notice the context window indicator in the status bar filling up, consider using the compact operation to optimize your conversation and reduce costs.
Language model selection
The AI Console supports multiple Claude models, each with different characteristics regarding intelligence, speed, and cost:
★Claude Haiku 4.5 - The fastest and most cost-effective model. Suitable for simple tasks, quick questions, and straightforward code modifications. Best choice when speed matters more than complex reasoning.
★Claude Sonnet 4.5 - Highly intelligent model balancing excellent performance with efficiency. Recommended for most tasks including complex code generation, architectural decisions, and detailed analysis. This is the default model.
★Claude Sonnet 4 - Previous generation balanced model. Good performance for general tasks but surpassed by Sonnet 4.5.
★Claude Opus 4.5 - The most advanced and capable model with the highest intelligence level. Excels at the most challenging tasks requiring deep reasoning, complex problem-solving, and sophisticated code generation. Most expensive option but provides the best results for difficult problems.
★Claude Opus 4.1 - Previous generation high-capability model optimized for complex reasoning tasks.
Additionally, you can enable the Extended thinking option, which allows the AI to spend more time reasoning about complex problems before responding. This can improve response quality for difficult tasks but increases processing time and costs.
The selected model and extended thinking setting are indicated with checkmarks in the context menu and are also displayed in the status bar.
Different models have different costs per token. Haiku is the most economical, while Opus models cost more but provide enhanced capabilities. Choose the model that best matches your task requirements and budget.
Managing attachments
The AI Console allows you to attach up to 9 files to your prompts, providing the AI with additional context:
★Click on the attachment button on the right side of the prompt input area.
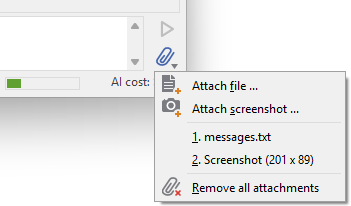
Attachment menu showing options to add files, screenshots, and remove attachments
The attachment menu provides the following options:
★ - Opens a file dialog allowing you to select text or image files from your file system.
★ - Captures a screenshot that will be included with your next prompt.
★List of attached files - Shows currently attached items with their names or descriptions. A click of an item, removes it from the attachments list.
★ - Clears all currently attached files and screenshots.
You can attach various types of content:
★Text files (source code, configuration files, documentation)
★Image files (screenshots, diagrams, UI mockups)
★Screenshots captured directly from your screen
Once attached, files remain associated with your next prompt. After sending the prompt, you can choose to remove the attachments or keep them for subsequent prompts.
TIP
Attachments are particularly useful when you want the AI to analyze specific code files, understand error messages from screenshots, or work with visual design references.
Understanding AI operations and project locking
When you send a prompt to the AI Console, the assistant may need to perform multiple operations to fulfill your request. During this time, several important behaviors occur:
Project locking
While the AI is processing your request and making modifications:
★Your ability to modify the project is temporarily locked.
★The AI takes exclusive control to prevent conflicts and ensure consistency.
★You can still interact with Embedded Wizard Studio and view project contents, but modifications are performed exclusively by the AI.
★The lock is automatically released when the AI finishes processing your request or when you abort the operation using the stop button.
This locking mechanism ensures that the AI's modifications are applied consistently without interference from simultaneous manual changes.
Update suppression
Complex modifications often require the AI to perform several steps. The intermediate project state between these steps may not be syntactically correct or fully functional. To prevent Embedded Wizard Studio from displaying errors and warnings during the modification process:
★All automatic project updates are suppressed while the AI is actively working.
★When the AI completes its work, all pending updates are performed at once.
★The final project state is then validated, and any errors or warnings are displayed in the Log window.
Due to update suppression, modifications made by the AI may not be immediately visible in Embedded Wizard Studio. For example, a newly added view appears in Composer only after the AI completes the entire request and updates are processed. This delay is normal and ensures the stability of the IDE during AI operations.
Aborting AI operations
If you need to stop the AI while it's processing your request:
★Click the Stop button that appears in place of the Send button.
When you abort an operation, the AI stops processing, but any changes already applied to the project remain. The project lock is released, and pending updates are performed.
AI tools and capabilities
The AI Console is equipped with a set of specialized tools that enable it to work effectively with your Embedded Wizard project:
★Project access tools - The AI can list, read, create, modify, rename, delete, and reorder project members including classes, methods, properties, slots, and more.
★Documentation access - The AI has access to Mosaic framework documentation and can retrieve information about framework classes and their usage.
★File creation - The AI can create text files in your project directory.
★Web search - When needed, the AI can search the internet for current information, particularly useful for recent changes in technologies or best practices.
When the AI uses these tools, dedicated entries appear in the chat history showing which tools were invoked and whether the operations succeeded. This transparency allows you to understand how the AI is working to accomplish your request.
The AI automatically determines which tools to use based on your prompt. You don't need to explicitly instruct the AI to use specific tools - simply describe what you want to accomplish, and the AI will use the appropriate tools to fulfill your request.
Enter Anthropic API key
The AI Console uses Anthropic's API services to provide AI assistance. Before you can use the AI Console, you need to obtain an API key from Anthropic and configure it in Embedded Wizard Studio:
★Visit Anthropic's website to create an account and obtain an API key.
★In the AI Console, click with right mouse button to open the context menu.
★Select the item .
★In the dialog window that appears, paste your API key.
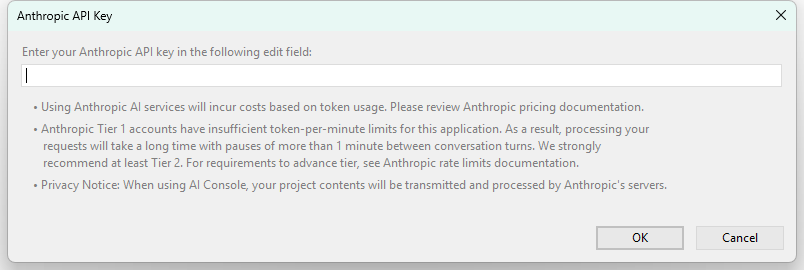
Dialog window for entering Anthropic API key
The API key is stored securely and used for all subsequent AI Console operations. Without a valid API key, the AI Console cannot function.
API usage through the AI Console is charged according to Anthropic's pricing. You are responsible for any costs incurred through API usage. The status bar displays accumulated costs to help you track your usage.
Integration with Log window
The AI Console can also be invoked directly from the Log window to help you fix errors and warnings. For more information about this feature, see the section Use AI assistance to fix errors and warnings in the Log window documentation.
How to use the AI Console effectively
The AI Console is a powerful tool that can significantly enhance your productivity when developing GUI applications with Embedded Wizard. Here are some suggestions for making the most effective use of this feature:
Start with questions and exploration
If you're new to the AI Console or working with unfamiliar code:
★Ask the AI to explain existing code or project structure: "Explain what the Application::MainMenu class does" or "What methods are available in the class opened actually in Composer?"
★Request information about Mosaic framework classes: "How do I use Views::Text?" or "What properties does WidgetSet::PushButton have?"
★Get guidance on best practices: "What's the recommended way to implement navigation between screens?"
Be specific and provide context
The quality of AI responses improves significantly when you provide clear, detailed information:
★Instead of "Fix this error", write "I'm getting a compilation error in the UpdateView method saying 'Unknown identifier currentIndex'. How can I fix this?"
★Instead of "Create a button", write "Create a Push Button in the Application::MainMenu class that presents the Application::Settings dialog when clicked."
★Include relevant details about your requirements, constraints, or the behavior you want to achieve.
Use for code generation and modification
The AI Console excels at generating and modifying code:
★Request new components: "Create a custom list item component with an icon, title, and subtitle."
★Add functionality: "Add a method to validate email addresses and return true if valid."
★Implement event handlers: "Add an OnPress handler to the SubmitButton that validates the form and shows a confirmation dialog."
★Generate entire classes: "Create a Settings screen with toggle switches for sound effects and music."
Leverage for debugging and troubleshooting
When encountering issues in your project:
★Describe the problem behavior: "The list view doesn't scroll smoothly when I have more than 20 items. Can you help optimize it?"
★Share error messages: Use the Log window integration or copy error messages into your prompt.
★Ask for diagnostic steps: "What could cause the background image not to display in the prototype?"
Request refactoring and optimization
Improve existing code with AI assistance:
★"Refactor the UpdateDisplay method to be more readable and efficient."
★"Can you suggest a better way to organize these repeated event handlers?"
★"Optimize this animation code for better performance."
Learn and understand
Use the AI Console as a learning tool:
★Ask for explanations: "What's the difference between a slot and a property in Chora?"
★Request examples: "Show me an example of how to use Effects::ColorEffect for a fade animation."
★Understand framework concepts: "Explain how the layout management works in Embedded Wizard."
Use attachments strategically
Take advantage of the attachment feature:
★Attach screenshots of visual issues or desired layouts.
★Include error log files or stack traces.
★Provide reference images for UI designs you want to implement.
★Share code snippets from external sources that you want to adapt.
Work iteratively
For complex tasks, break them down into steps:
★Start with basic structure: "Create a basic login screen with username and password fields."
★Add functionality gradually: "Now add validation to ensure the username is not empty."
★Refine the implementation: "Add visual feedback when the login fails."
This iterative approach allows you to review each step and ensure the AI is heading in the right direction.
Review and verify
Always maintain quality control:
★Inspect the code generated by the AI in the Composer or Code Editor.
★Test the functionality using prototyping and debugging.
★Verify that the solution meets your requirements and follows your project's conventions.
★Don't hesitate to ask follow-up questions if something isn't working as expected.
TIP
The AI Console learns from the context of your actual conversation. If you're working on a specific area of your project, the AI will maintain awareness of previous discussions and modifications, allowing for more coherent assistance across multiple prompts.
Hide the window
If you want to close the AI Console:
★Click on the close button  in the upper-right corner of the AI Console window.
Once hidden the AI Console can be made visible again:
★To show the AI Console select the menu item .
★or use the keyboard shortcut AltShift0.