Embedded Wizard Connect for Figma: Initial design import
Workflow
IMPORTANT
The next steps involve using the generic import/export feature. It is recommended to read the relevant documentation first to understand how to invoke and configure an external tool within Embedded Wizard Studio.
Exporting design data from a Figma project is one step in the design-to-code process. The next step involves importing the design data into an Embedded Wizard project. To accomplish this, you will use a Python-based import application called FigmaDesignImporter.py. Ensure that Python is installed on your computer, preferably version 3 or above, to execute this script successfully.
Please download and install the latest Python version from the official source:
![]() Download the latest Python version for Windows
Download the latest Python version for Windows
Next, download and unzip the import script from the following link:
After Python is installed on your computer, you can use the following command to locate it. Just enter it into a Windows Command Prompt.
where python
To invoke the import application using Python you can use a command call like the following. Note that the Python executable may be located in a different folder, depending on your username and installation settings. For simplicity, we assume you have unpacked the Python script into C:\Scripts\FigmaDesignImporter.py.
"C:\Users\<User name>\AppData\Local\Programs\Python\Python311\python.exe" "C:\Scripts\FigmaDesignImporter.py" [Options]
If you have added Python to your environment variables, you can use a simplified command:
python "C:\Scripts\FigmaDesignImporter.py" [Options]
Please take care to use the quotes in case the path contains spaces.
Preparation of an Embedded Wizard unit
The exported content within the .ewx file represents an Embedded Wizard unit. Therefore, the import must be performed into an existing unit within an Embedded Wizard project. If you are unfamiliar with the concept of a unit, please refer to the related documentation to learn how to create and configure an Embedded Wizard unit.
During the import process, all bitmap and SVG resources will be stored in a folder named Resources within the unit’s main directory. To ensure a strict separation of the imported content, a unit’s directory can be set. This prevents resources from being mixed with manually created resources that might be stored in the same folder.
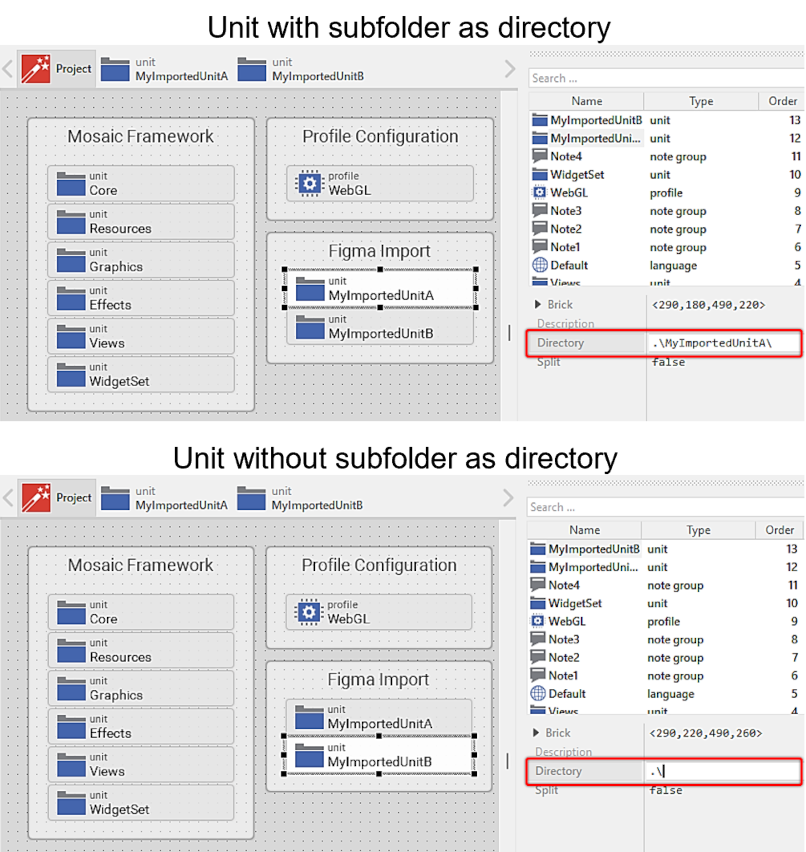
Configuration of the unit directory.
For the next steps in this guide, it is assumed that a unit named MyImportedUnit without any members is provided. However, the import step can also be performed in a unit with existing members.
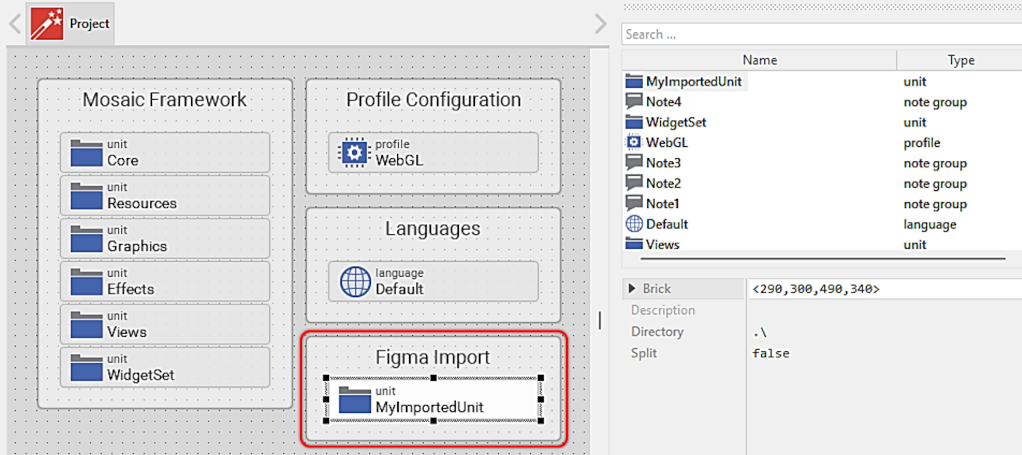
Example unit for design data import.
Example design
To better understand the upcoming steps, we will refer to a simple Figma design.

Example Figma design.
This example consists of three frames. One frame, named Components, contains components that are instantiated in the other two frames, named Init and Home. This Figma design has already been exported into an .ewx file and is stored in the project folder.
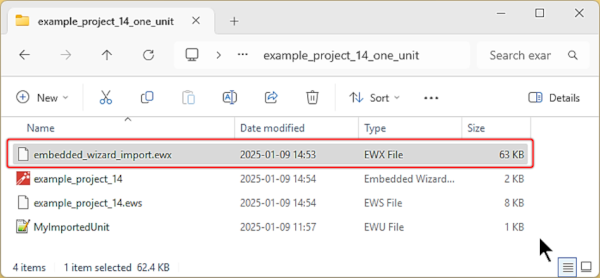
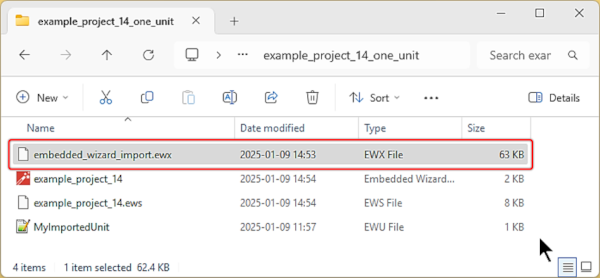
Locating the .ewx file.
Initial Import
To initially import the design, open the generic import tool under
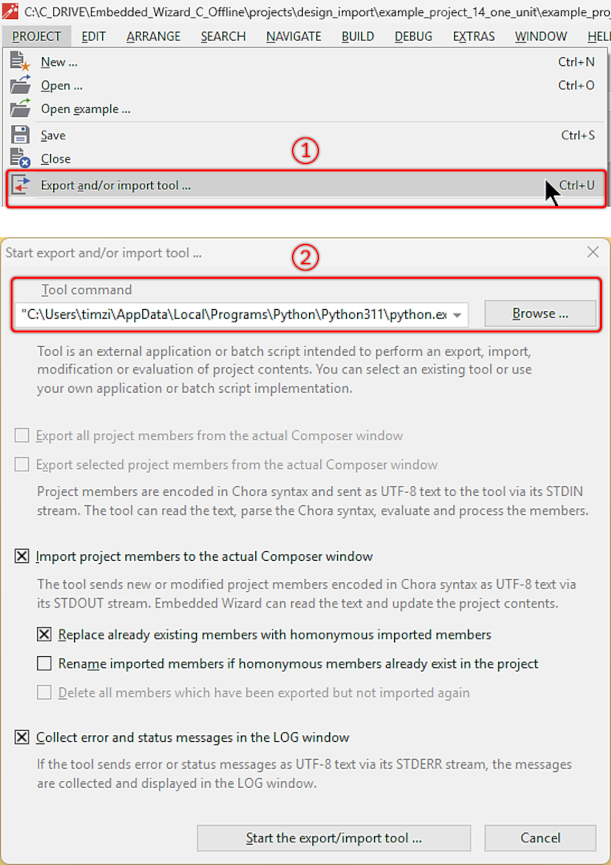
Starting the generic import and export tool.
Next, configure the tool command. Invoke the design importer with the path to the .ewx file using the --path_ewx argument. You can specify this path as either absolute or relative. If you choose a relative path, it will be based on the Embedded Wizard project folder. As mentioned earlier, in this example, the .ewx file is located in the Embedded Wizard project folder, so there is no need to enter the full path.
Selecting the .ewx file with an option parameter.
Use the following tool command:
"C:\Users\<User name>\AppData\Local\Programs\Python\Python311\python.exe" "C:\Scripts\FigmaDesignImporter.py" --path_ewx embedded_wizard_import.ewx
For the initial import, the following checkbox selection is sufficient:
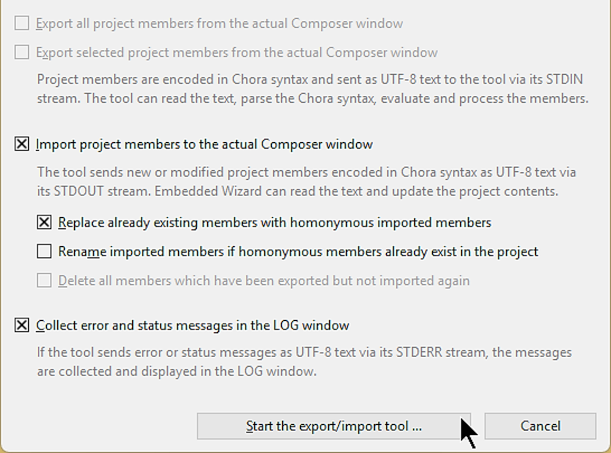
Initial design import.
After continuing by pressing , the unit will be populated with all the required members to represent the Figma frames within Embedded Wizard. For this example, the unit content appears as illustrated in the image below:
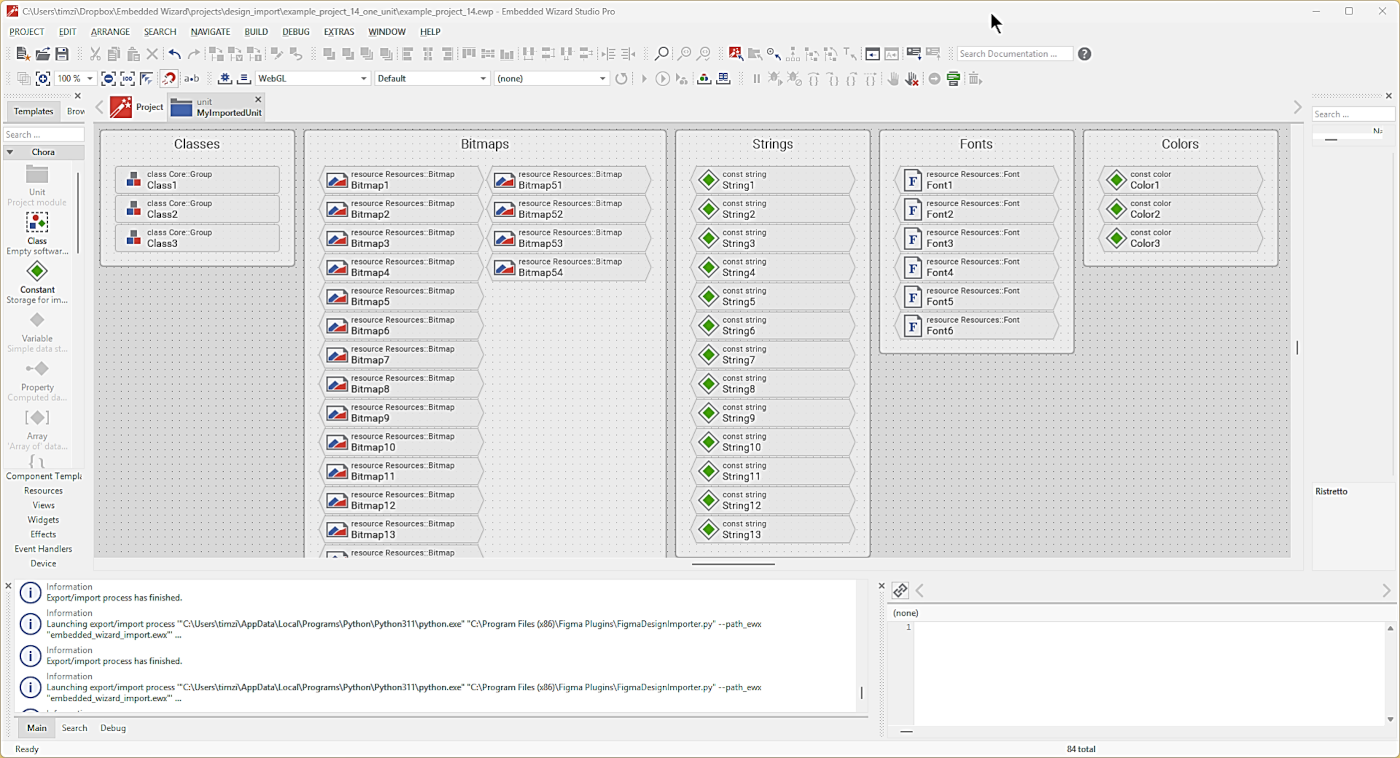
Example content of an Embedded Wizard unit after initial import.
An exported unit may contain up to five categories, including all required classes, bitmaps, SVGs, strings, fonts, and colors. In the example above, the actual Figma frames are represented by the classes Components, Init, and Home.
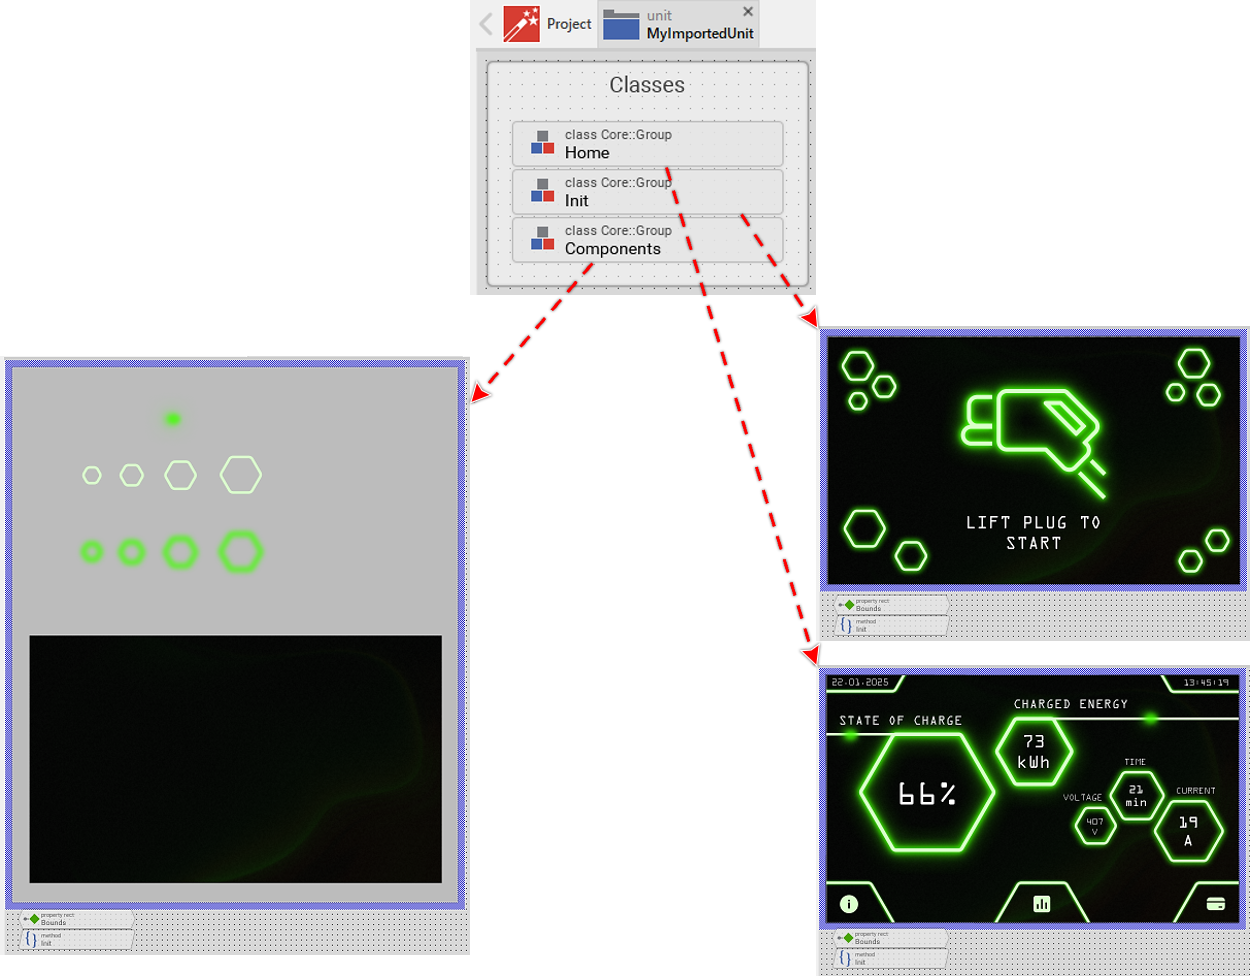
Figma frames replicated as Embedded Wizard classes.
Next steps
From this point onward, the subsequent steps are typically carried out within Embedded Wizard Studio. Since Figma is primarily used for designing a UI without any actual functionality, this aspect is clearly absent in the exported Embedded Wizard unit. Any form of interactivity, ranging from simple buttons to touch gestures and dynamic component management, needs to be manually integrated within Embedded Wizard Studio.
Below is a list of tasks that may be helpful to perform as next:
★Reviewing the exported components in Embedded Wizard Studio. Despite the export process being very mature, in rare cases the exported result may not match the Figma design. Therefore, it is recommended to open and review each class and exported resource file. Additionally, you can verify and understand the graphical elements each class is composed of. As mentioned in the settings section, the Figma export plugin can be configured to export content in various formats. For example, if you wish to export icons as SVG strings or SVG resources, you can adjust the export settings to achieve the desired format in Embedded Wizard Studio.
★Adding interactive functionality. An exported unit is, by nature, a static representation of the Figma design. Due to current logical limitations, the export plugin cannot determine whether an exported image resource is intended to be used as a button, slider, or any other interactive object. Therefore, it is necessary to replace the image resource with the appropriate Embedded Wizard widgets or to reuse the image resource as part of an Embedded Wizard widgets.
★Refactoring the Figma design. Typically, designers have an entirely different view on a user interface than an embedded software engineer. For example, the engineer may want to use a dedicated part of a frame to be exported into a separate Embedded Wizard class. Let’s imagine a frame with a popup message. In this case, only the actual popup should be represented as a class. Therefore, it may be useful to adapt the Figma design in a way that it only shows the popup in a frame, not the entire screen. Another aspect of refactoring may involve renaming color or font constants, either by directly changing the Figma object names or by utilizing the name mapping feature available in the plugin settings.
★Merging of components. At this point, it is probably already clear that each frame or section will be exported as an individual class. Sometimes, a frame or section represents the entire content of a screen state, while at other times, only a fraction of it. In such cases, the actual screen state has to be realized by merging several components into one. To do so, each component can be instantiated in a new main component, or the content of each subcomponent can be copied and pasted within the main component. The first option has the advantage of making partial re-import easier.
★Merging of resources. Generally, the plugin exports an image resource for each Figma object. The only exceptions to this rule are components and instances. In these cases, a bitmap resource may be reused across all automatically generated classes. However, this characteristic may result in the export of identical image resources. To avoid exporting the same resource multiple times, same-looking Figma objects should be converted into a component and instances of it. If this cannot be done, it is recommended to review the resource folder and bitmap resources to identify identical images and limit them to a single resource. Particularly for targets with limited flash available, this can drastically reduce storage requirements. However, for targets with minimal flash restrictions, it may be feasible to use the resources as is.
All of these tasks require a more profound understanding of how Embedded Wizard works. Therefore please refer to the Working with Embedded Wizard to learn how to use it.