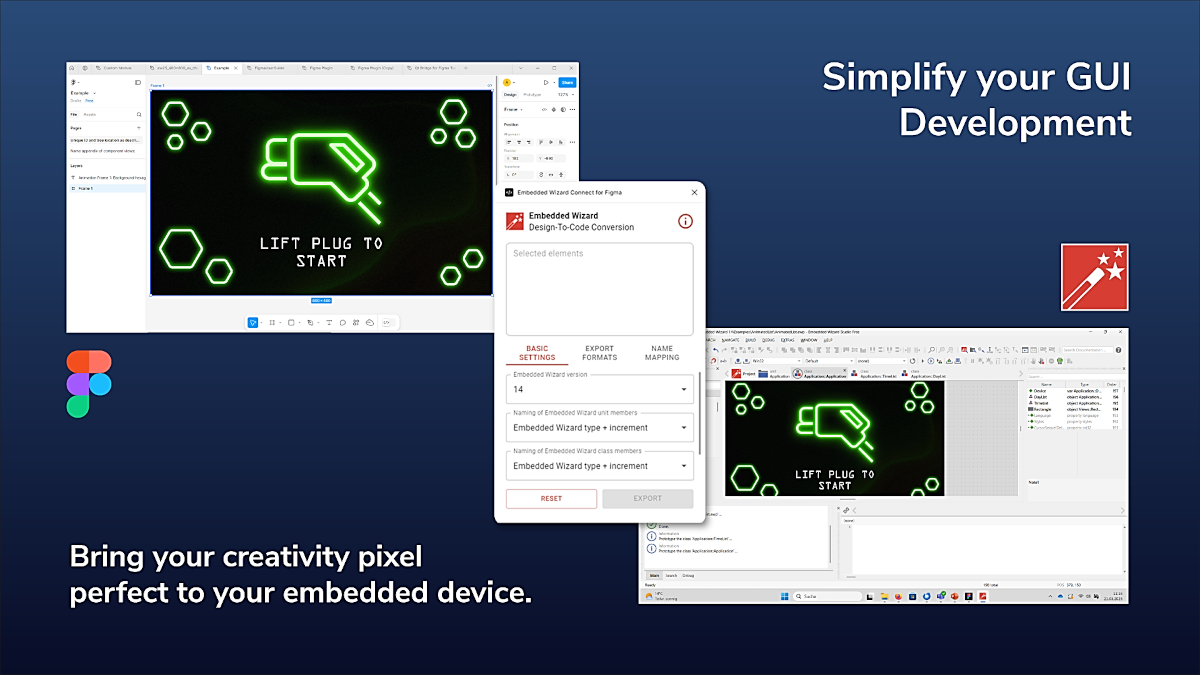
Embedded Wizard Connect for Figma: Plugin installation and usage
Installation
IMPORTANT
To access the Embedded Wizard Connect for Figma plugin, navigate to the corresponding Figma community page and click the button.
Plugin download from Figma community.
After opening the plugin for the first time, it can also be accessed through within any other design project. Each time the plugin is launched, it runs its latest version, eliminating the need to install multiple versions simultaneously.
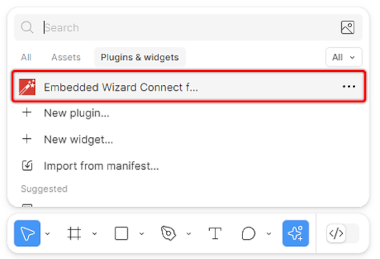
Start of the Embedded Wizard Connect for Figma plugin.
The Embedded Wizard Connect for Figma plugin can be used with any Figma design, but it is not available in Figma Dev mode. Additionally, read/write access to the design project is required.
If these requirements cannot be met, consider the following workarounds:
★Create a local copy of the design file in a private workspace.
★Export the design as a .fig file and add it to a private workspace.
For more information on using Figma plugins, please refer to the Figma documentation.
Usage
Once the Embedded Wizard Connect for Figma plugin is opened in Figma, the interface looks as follows:
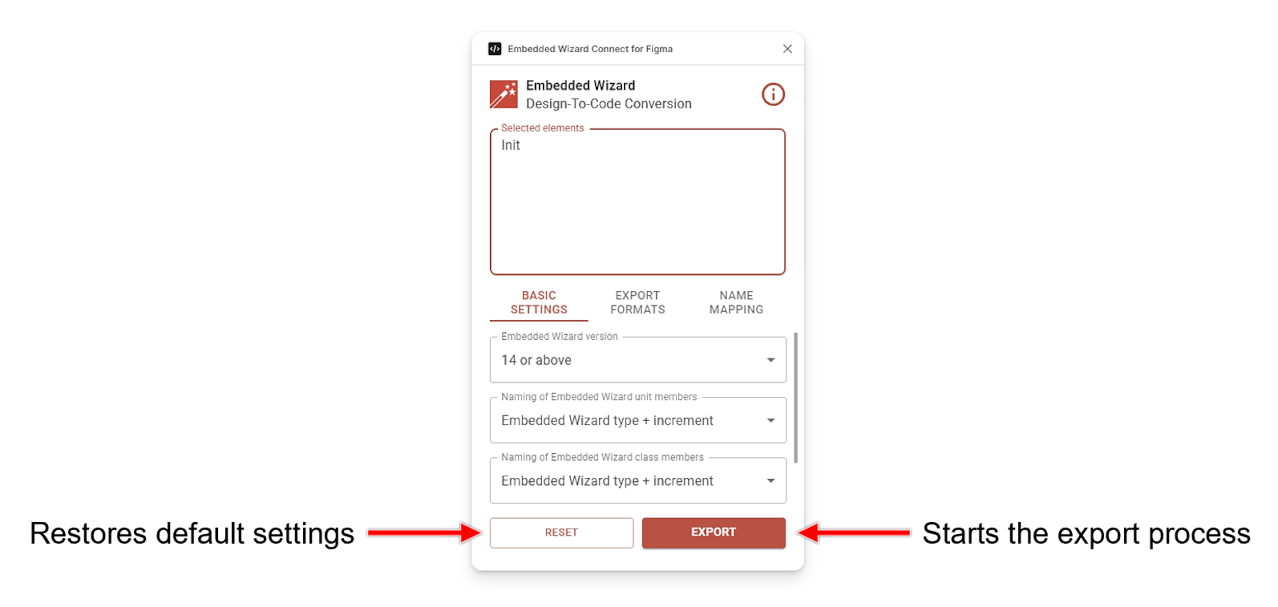
Plugin interface.
After starting the plugin, the default settings can be used for most designs. If the default settings need to be restored, use the button. At the start, the plugin tries to restore settings from previous sessions whenever possible. This feature relies on local cache settings and, in some cases, settings can be restored for up to 30 days. Whenever the plugin is started on another computer or with a different Figma account, it starts with the default values again.
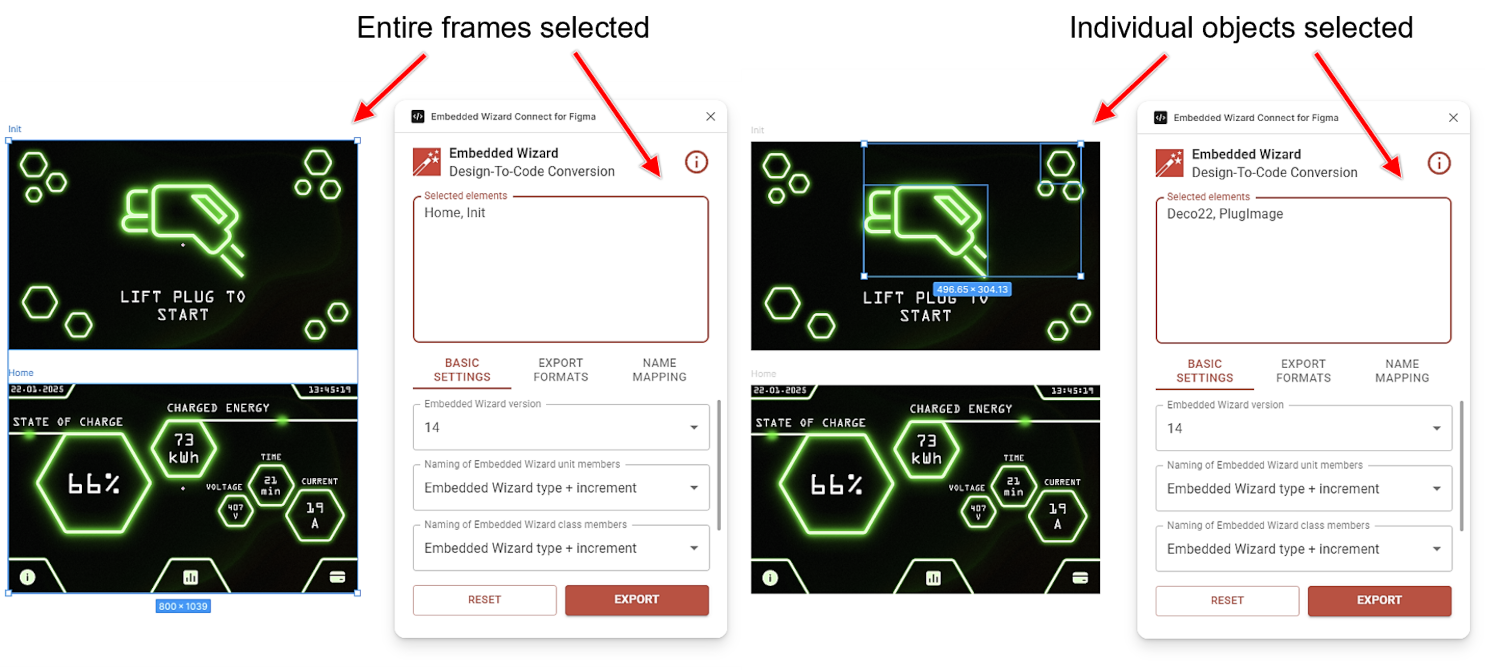
Selecting elements for export from canavas area.
For an export, it is necessary to select one or several elements. Elements can be selected from the Figma canvas area or from the navigation panel on the left side. It is possible to select the entire content of the page, single frames, groups, sections, or just one single element. Generally, there are no limitations on which elements can be converted to an Embedded Wizard unit. The text field Selected elements will be populated according to the current selection.

Selecting elements for export from navigation panel.
Since designers usually do not follow the same practices, it sometimes makes sense to select an entire frame, and sometimes only a part of a frame. Nevertheless, with the Embedded Wizard Connect for Figma plugin, it is very intuitive to test your optimum selection by learning through trying.
TIP
The plugin generally follows the principle that any Figma element, without exception, can be converted.
At the bottom of the plugin interface, three tabs with settings and further options can be seen. As mentioned, it is fully optional to change settings. However, in some cases, it might be very useful to adjust the export behavior.
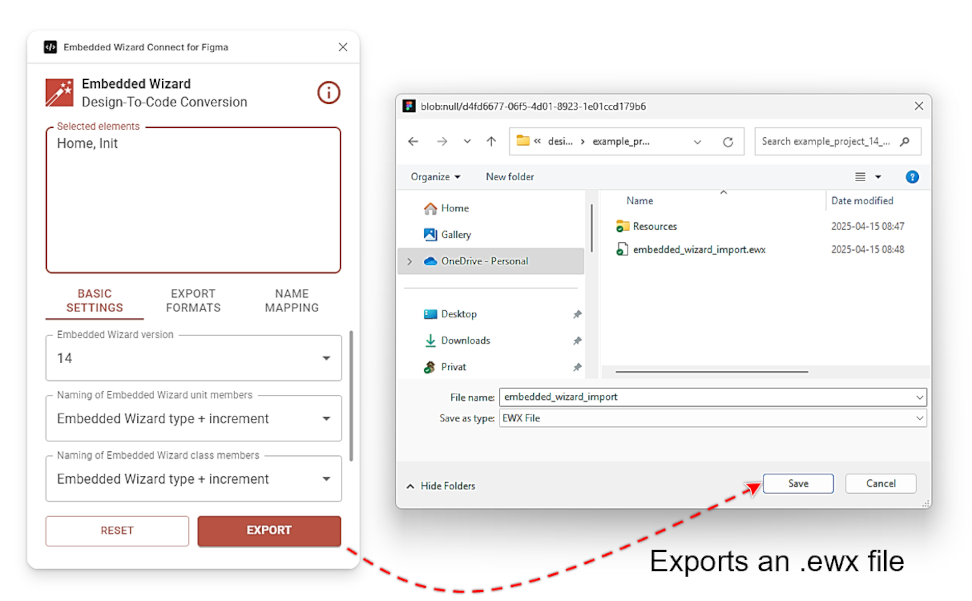
Saving of .ewx file.
When the button is pressed, the plugin converts the selected Figma note into an .ewx file. This process typically takes a few seconds, but for very large designs, it may take a few minutes. Once the .ewx file is ready, a download dialogue will appear. The .ewx file can be stored anywhere on the hard drive, but it is recommended to save it in the project folder of the Embedded Wizard project where the import will occur.
Console output
As part of the export process, the plugin records a wide range of information in the Figma development console. In certain cases, it may be useful to review this log for warnings, notifications, or errors. To access the console, navigate to . A typical console output is shown in the following screenshot:
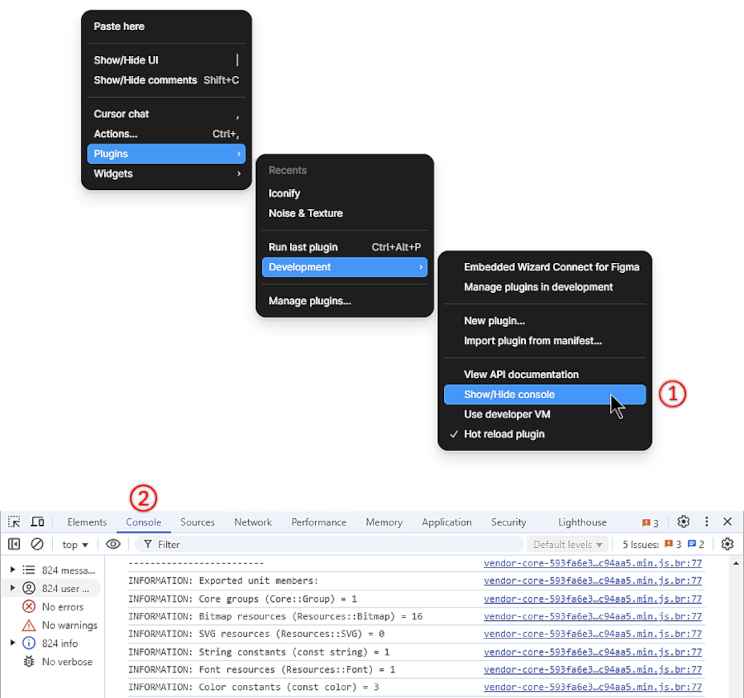
Figma console output.
The console output is particularly helpful for understanding why a specific Figma node is converted into a particular Embedded Wizard view. It also provides details about which bitmap and SVG resources were generated during the export and whether resources were reused.
Configuration
Basic settings - Embedded Wizard version
By default, the plugin always exports the content for the latest available Embedded Wizard version. If it is desired to export the content for an older version, this setting can be used. Please note that no versions older than Embedded Wizard 14 are supported. For all users who want to use the Figma export feature, we recommend upgrading to the latest Embedded Wizard version.
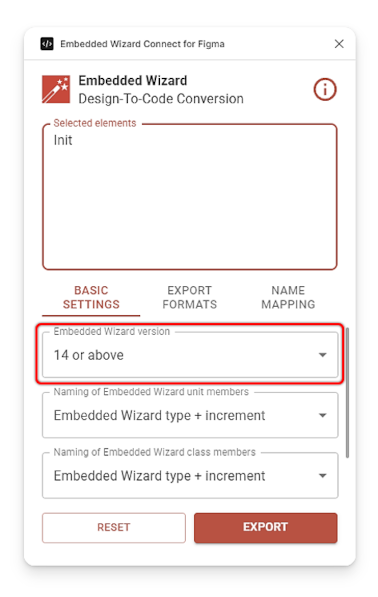
Basic settings - Embedded Wizard version.
Basic settings - Naming of Embedded Wizard unit members
When importing a design into Embedded Wizard, a unit will be populated with a wide range of members, such as classes, bitmap resources, or font resources, etc. In Embedded Wizard, the names of these members must be unique and cannot start with a number or special character. There are three options for assigning unit member names:
★Embedded Wizard type + increment: This naming option uses the type of the Embedded Wizard unit member (e.g., Class, String), followed by an incremental number. It ensures clean naming that adheres to the Embedded Wizard naming conventions. However, a drawback is that the names may change when additional design objects are added to the Figma project.
★Embedded Wizard type + Figma ID: This method also begins with the type of the Embedded Wizard unit member (e.g., Class, String), followed by the unique Figma ID. Like the first option, this ensures clean and consistent naming, but it has the added benefit of keeping the names static during re-import. This makes it possible to reference unit members from other parts of an Embedded Wizard project.
★Figma name + Figma ID if duplicated: With this option, all unit members are named the same as their corresponding Figma objects. If a name is already in use by another unit member, the Figma ID is added to create a unique name. This option also consistent naming. Names that deviate from the Embedded Wizard naming convention will be adjusted accordingly.
Please refer to the following illustration, which highlights all three naming options with examples.
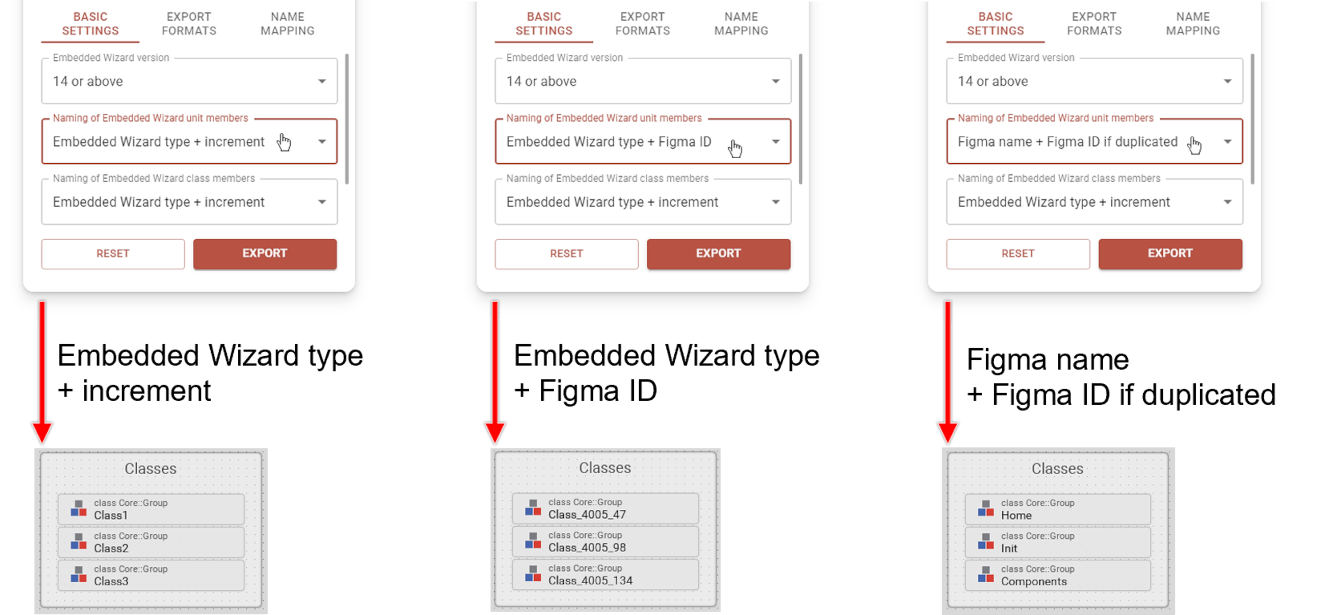
Basic settings - Naming of Embedded Wizard unit members.
As previously mentioned, names in Embedded Wizard must be unique and cannot begin with numbers or special characters. Please note that, in rare cases, multiple unit members may attempt to use the same name and Figma ID. For instance, when exporting a single text element, the resulting class, font ressource, and string resource might all try to share the same name and Figma ID. In such situations, the Figma ID is added multiple times to ensure uniqueness.
Basic settings - Naming of Embedded Wizard class members
Part of the imported content includes classes. A class typically contains a canvas area along with graphical objects, referred to as views. Similar to unit-level naming, the names of these views must be unique and cannot begin with a number or special character. The plugin provides three options for assigning class member names:
★Embedded Wizard type + increment: This option assigns a name based on the type of the Embedded Wizard class member (e.g., Image, Rectangle), followed by an incremental number. It ensures clean naming that complies with Embedded Wizard naming conventions. However, the drawback is that names may change if additional design objects are added to the Figma project.
★Embedded Wizard type + Figma ID: This option also uses the type of the Embedded Wizard class member (e.g., Image, Rectangle), followed by the unique Figma ID. Like the first option, it ensures clean and consistent naming but has the added advantage of keeping names static during re-import. This allows for referencing class members from other parts of an Embedded Wizard project.
★Figma name + Figma ID if duplicated: With this option, class members are named after their corresponding Figma objects. If a name is already in use by another class member, the Figma ID is appended to create a unique name. This option also consistent naming. Names that deviate from the Embedded Wizard naming convention will be adjusted accordingly.
Please refer to the accompanying illustration, which demonstrates examples for all three naming options.
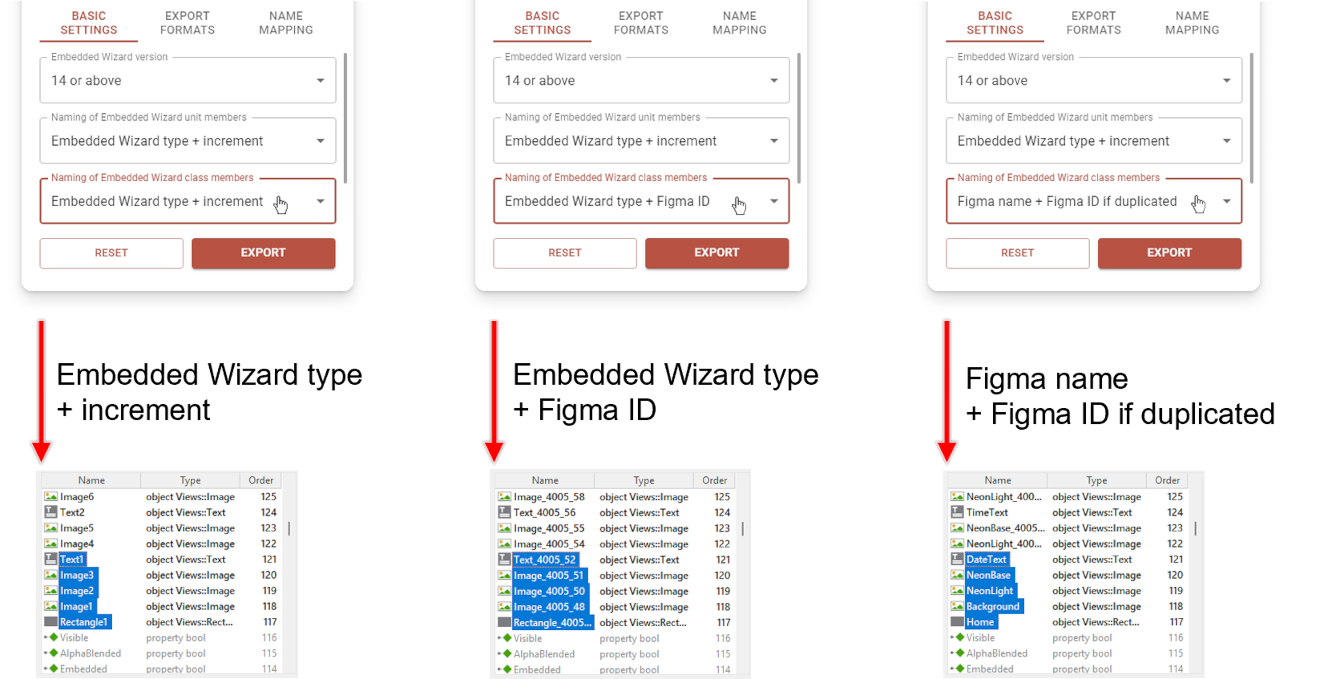
Basic settings - Naming of Embedded Wizard class members.
It should also be noted that certain Figma objects result in the creation of two or more Embedded Wizard class members. For instance, rectangles with a homogeneous border convert to a rectangle view and a border view. In such cases, both views will initially attempt to use the same name and Figma ID, but the second view will only include its Figma ID to ensure uniqueness. If an object name remains non-unique despite the appended Figma ID, the Figma ID will be repeatedly added until all naming conflicts are resolved.
Basic settings - Description of Embedded Wizard class members
Sometimes, it can be helpful to identify which Figma object corresponds to a specific Embedded Wizard element. To help in this matter, the unique Figma ID of the object, along with its location within the navigation panel, can be added as a description in component views. This description serves solely for informational purposes and does not influence the export of the Figma design.
★None: The description field of class members remains empty.
★Figma ID + Figma location: The description field includes the Figma ID along with its hierarchical location in the tree, starting from the main page.
The illustration below demonstrates examples for both options.
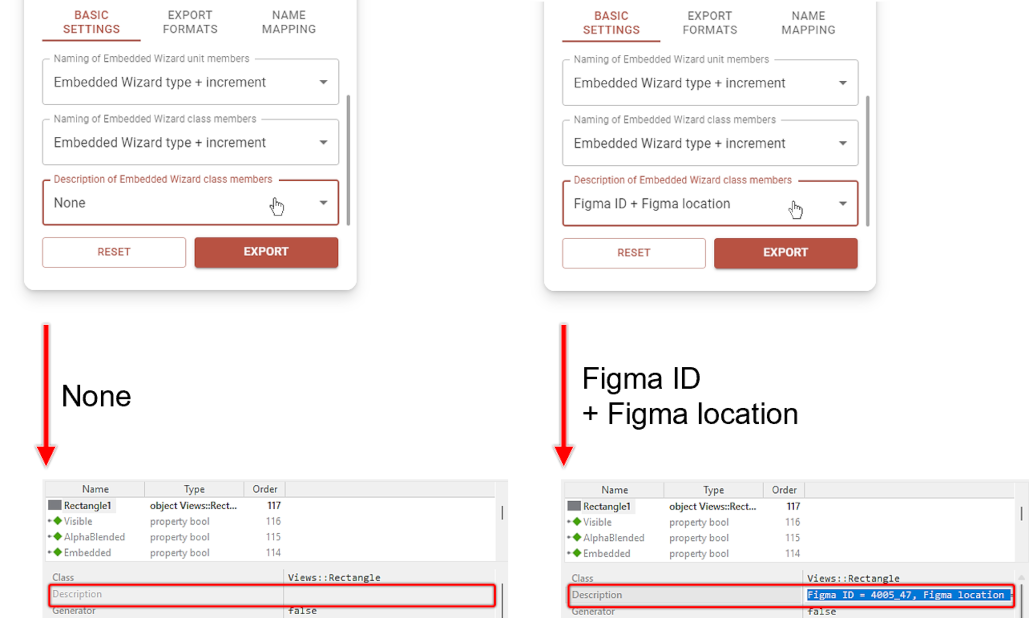
Basic settings - Description of Embedded Wizard class members.
Export formats - Figma components and instances
A commonly used concept in Figma is the creation of reusable components. For instance, when a button needs to appear multiple times in a design, it is considered best practice to design the button, convert it into a component, and place instances of this component across the GUI. This approach allows the same object to be reused multiple times, ensuring that any modification to the parent component is automatically reflected in all child components. Components can be applied to a variety of graphical elements, such as buttons, icons, or logos, which often consist of multiple child elements. For example, a button might include the background and an icon. In such cases, exporting the entire component as a single image is often more practical than exporting individual resources for each child element. However, there may be situations where exporting child objects individually is preferred over exporting the overall component.
The plugin offers the following options for managing the export format of components and instances:
★One resource per component/instance: This option exports a single bitmap or SVG resource for each component and instance. When selected, the plugin attempts to optimize the reuse of image resources wherever possible. For resource optimization to work, both the main component and its instance must be selected. Reuse is only achievable if the instances remain unmodified, apart from adjustments to the contained text.
★Individual resources for each child: As the name suggests, this option ensures that all child objects within a component or instance are exported individually.
The plugin offers the following options for managing the export of components and instances:
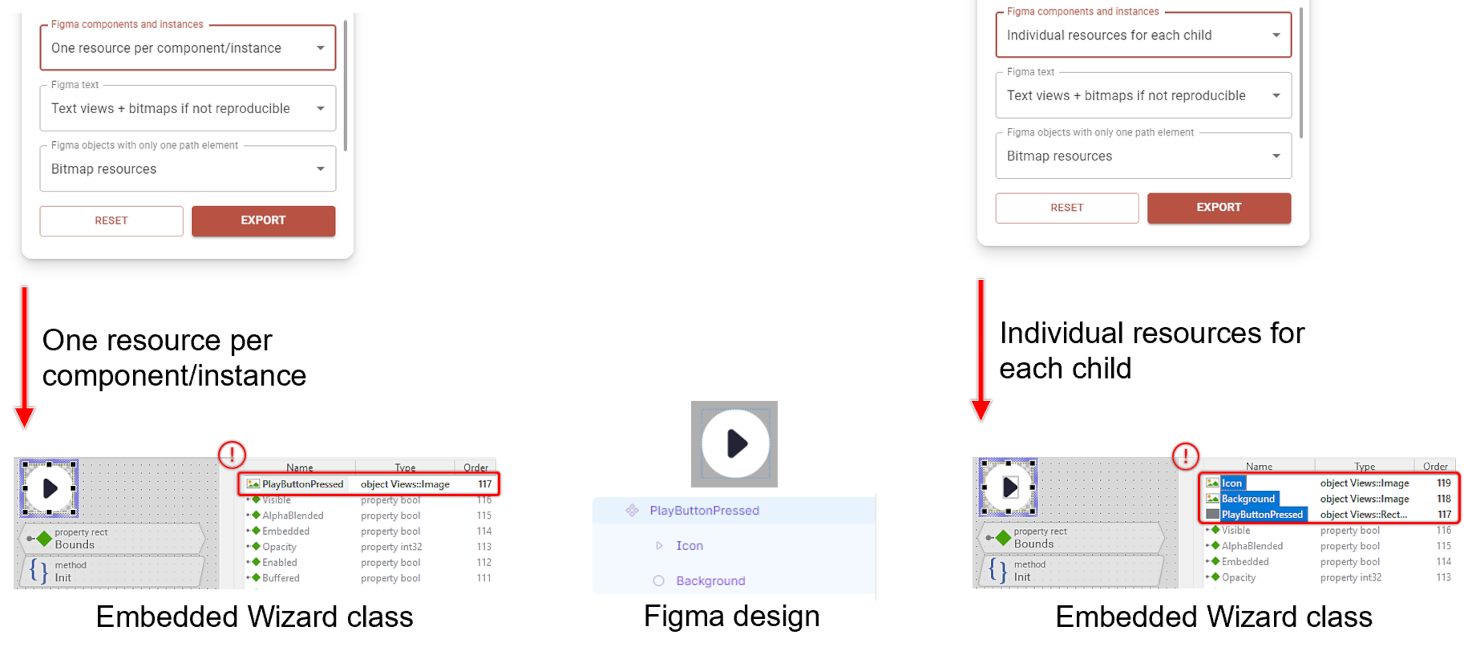
Export formats - Figma components and instances.
If resource reuse does not function as intended, it is likely due to certain properties of the instance being altered. If these changes were accidental, all modifications can be reverted to ensure the instance matches the parent component. Todo so, please perform Right click on the instance and select Reset all changes. The only modification allowed while still enabling resource reuse is altering the text within instances. For example, changing the caption of a button instance will still permit the button image to be reused. Please refer to the following illustration for further clarification:
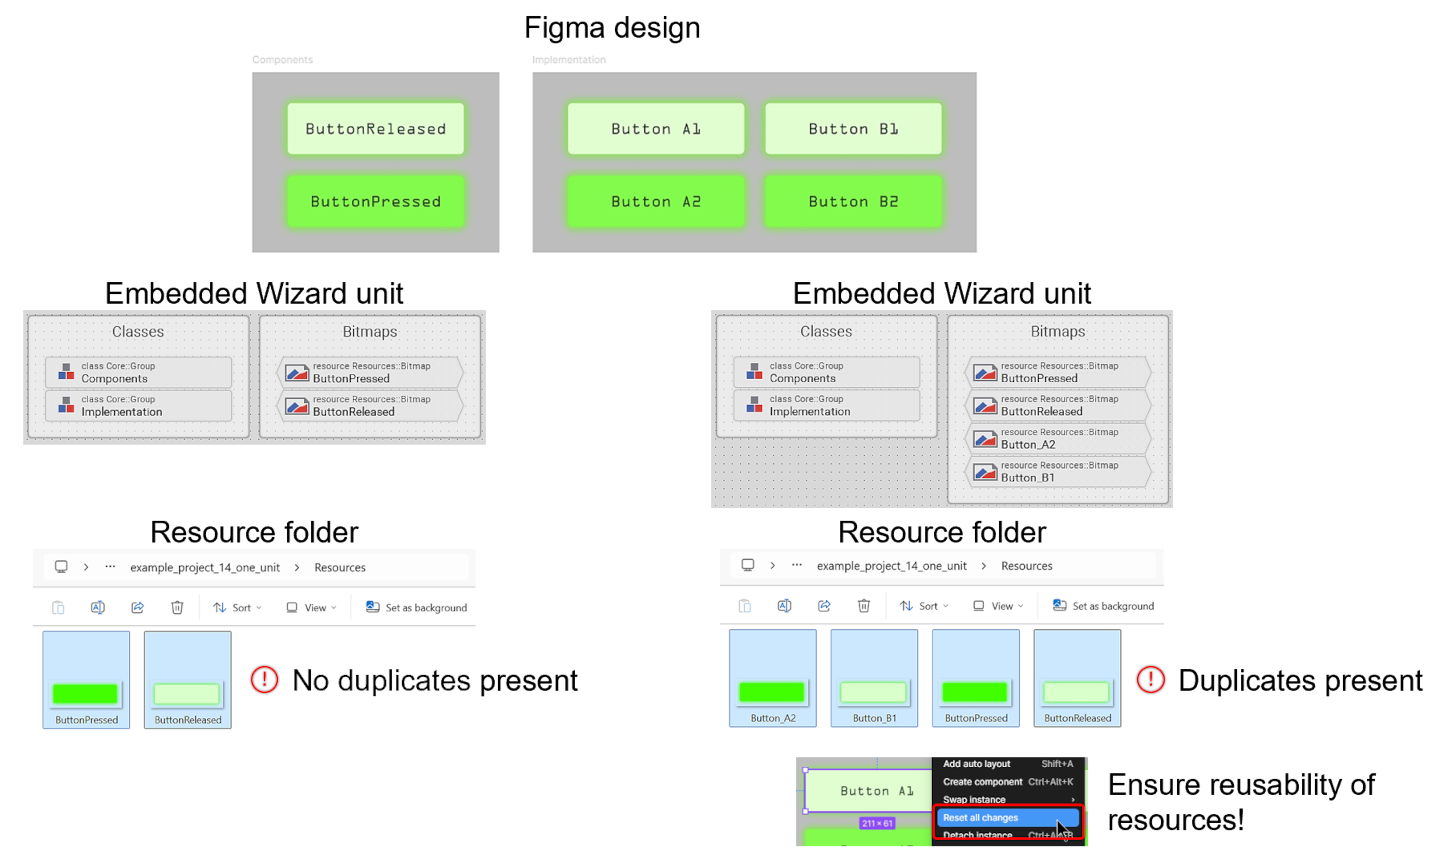
Export formats - Figma components and instances - Forced reusability.
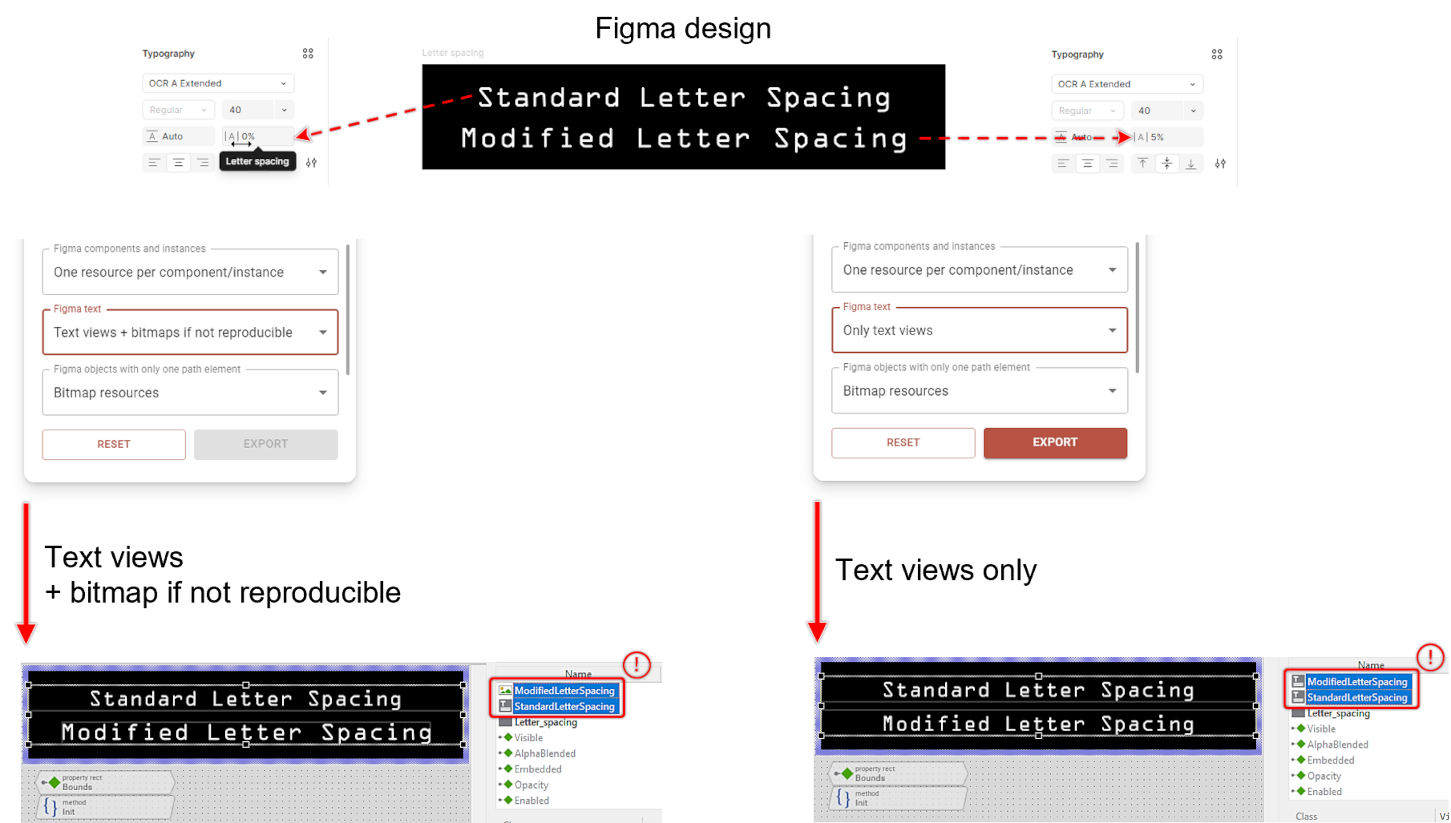
Export formats - Figma text
In a graphical user interface it is often necessary to change text based on language settings or the state of the user interface. Therefore, the Embedded Wizard Connect for Figma plugin typically converts Figma text elements to text views in the resulting Embedded Wizard classes. However, by default, the plugin tries to balance exact visual replication with the ability to modify the text later. Practically speaking, this means that when a text format cannot be replicated with an Embedded Wizard text view, the object will be exported as a bitmap. For example, in a company logo, the text may have a very specific look (e.g., special letter spacing, rotation of the text) and probably won’t change over the lifespan of the user interface. Thus, this text element may be exported as an image view to ensure an exact visual match. However, the plugin can also be configured to strictly convert all text elements as text views.
To enable or disable this feature, the following options are available:
★Text views + bitmaps if not reproducible: When text elements can be accurately reproduced, a text view is used. However, if certain formatting cannot be replicated, a bitmap resource is utilized instead, which may lead to some text being exported as image views.
★Only text views: Regardless of whether text formatting can be perfectly replicated, all text elements are exported as Embedded Wizard text views. This option provides maximum flexibility for runtime text modifications but may result in slight visual discrepancies from the original Figma design.
The plugin offers the following options:
Export formats - Figma text.
As mentioned earlier in this chapter, the Embedded Wizard Connect for Figma plugin outputs information for each Figma object during the export process. For clarification on why a text was not exported as a text view or appears different, additional details can be found in the console output:
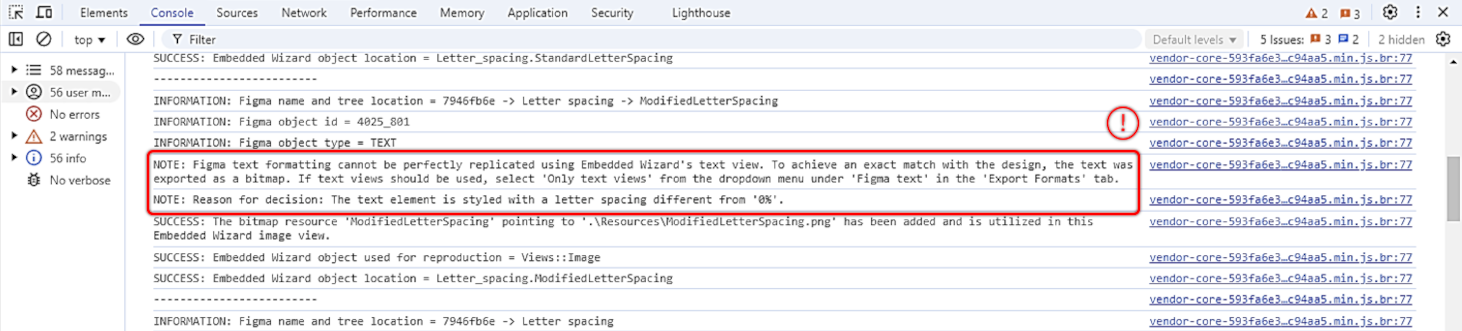
Export formats - Figma text - Console output.
TIP
At this stage, it is helpful to understand how to Convert text to vector paths within Figma. Using this option, a text element is transformed into a vector element, which can be exported as an SVG string or SVG resource. This approach allows the avoidance of text views and font resources altogether.
Export formats - Figma objects with only one path element
By default, the Embedded Wizard Connect for Figma plugin exports only bitmap resources, which typically ensures the most accurate replication of the design. However, this approach is not always the most efficient within Embedded Wizard Studio. Simple geometric shapes can often be represented as path views which are initalized with a SVG string, enabling them to be rendered at runtime instead of relying on bitmaps. This is particularly useful for elements such as charts, icons, or basic shapes like circles and arrows. By utilizing this feature, it is possible to reduce the number of required bitmap resources, resulting in a lower overall footprint. The term one path element refers to an object that, if exported as a SVG using Figma's export feature, would contain only one <d></d>attribute.
If a Figma object meets this requirement, the following export formats can be chosen:
★Bitmap resources: Standard export as bitmap resources, referenced using an image view.
★Path views and SVG strings: Utilizes stroked path or filled path views configured by a SVG string during class initialization. This option eliminates the need for bitmap or SVG resources but may lead to slightly higher CPU usage. It is beneficial for embedded systems with limited ROM but sufficient computational power.
★SVG resources: As SVG paths (<d></d>) are a subset of the SVG standard, an SVG resource can be used instead of a PNG file. This option enables scaling and rotation transformations without compromising quality.
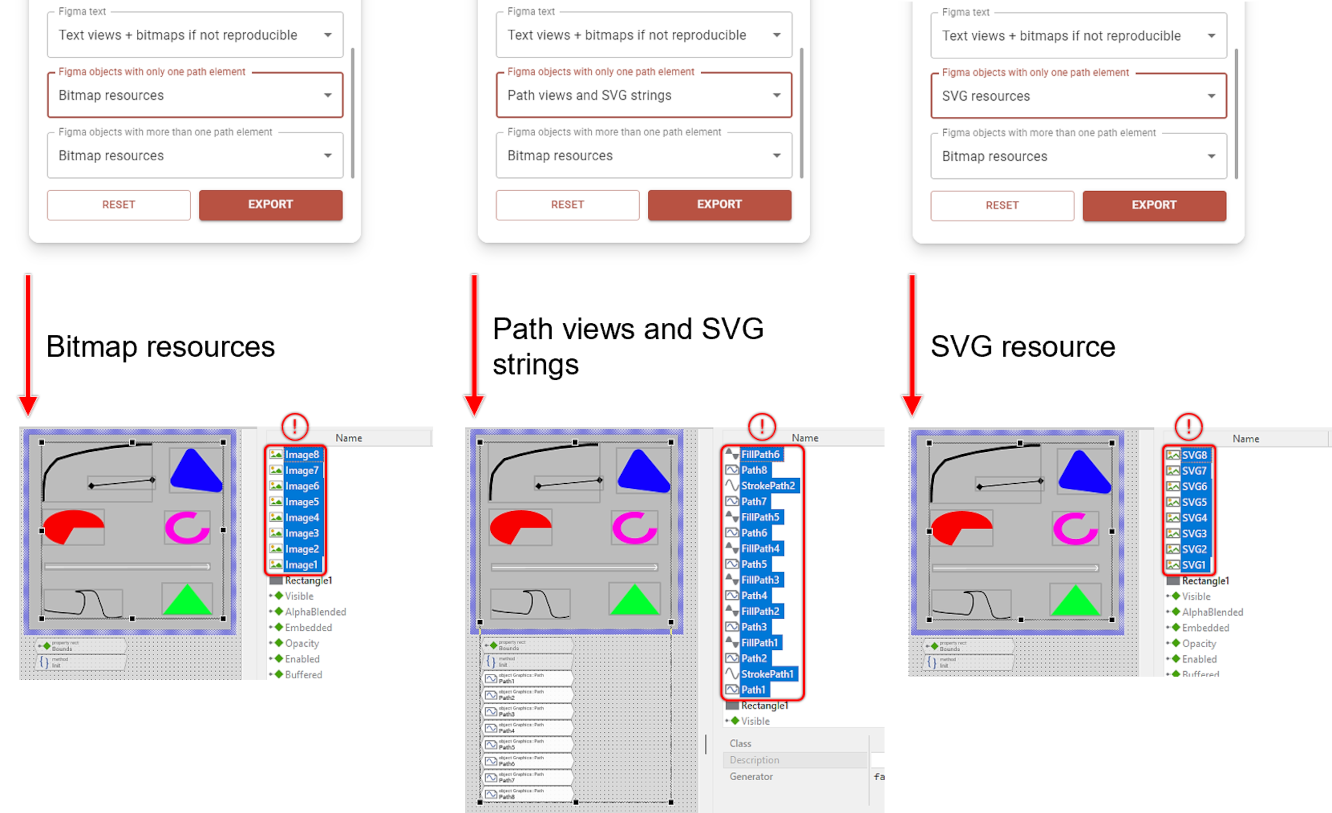
Export formats - Figma objects with only one path element.
Export formats - Figma objects with more than one path element
Figma internally handles almost all graphical objects as vectors. Consequently, its export feature allows for exporting either individual design elements or the entire design as SVG resources. However, due to the extensive complexity of the SVG standard, Embedded Wizard supports only a subset of the SVG standard. This limitation also applies to the Embedded Wizard Connect for Figma plugin. As described in the previous section, the plugin parses the SVG content of a Figma object to identify the attributes it uses. While Embedded Wizard's SVG feature supports a wider range of attributes, the Embedded Wizard Connect for Figma plugin currently only supports the <d></d> attribute. Unlike the previously explained settings, here the term more than one path element refers to cases where multiple <d></d> attributes are used to reconstruct the graphical object. If this requirement is met, users can choose whether to export the Figma object as SVG or bitmap resources.
Available options:
★Bitmap resources: Exports the object as bitmap resources, referenced via an image view.
★SVG resources: Exports the object as SVG resource, which is used within a SVG view. SVG views offer the advantage of allowing transformations such as scaling and rotation without any loss in quality.
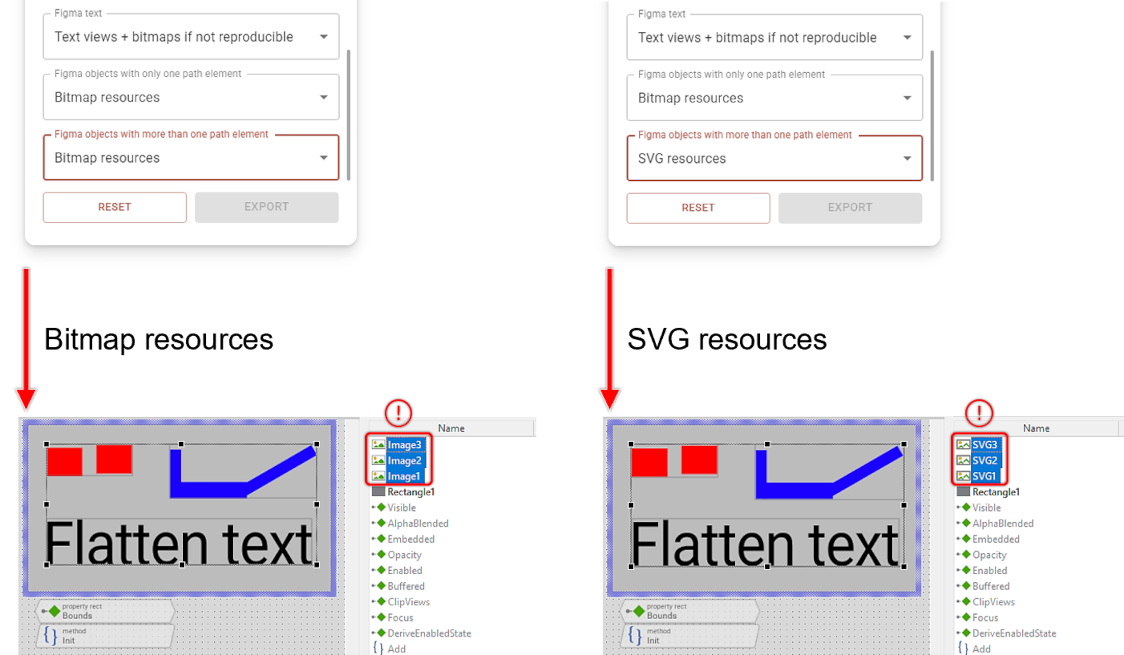
Export formats - Figma objects with more than one path element.
TIP
For more details on how Embedded Wizard manages SVG resources, please refer to the relevant documentation.
Name mapping
A name mapping feature can be configured using the information entered in the text field on the third settings tab. This field requires a valid JSON data structure. If the provided data does not represent a valid JSON structure, the information will be ignored. It is recommended to validate the input in this text field with a publicly available JSON validator. Users can insert the JSON data via copy and paste or use the dialog, which can be opened with the corresponding button.
To assist with the format of the required JSON data structure, a template can be inserted using the button. This will insert the following template JSON structure:
{ "fonts": { "*": "Arial" }, "objects": { "old_name": "new_name" } }
As shown, there are two ways to rename objects before exporting them: the font names used and the names of the Embedded Wizard unit and class member. With the wildcard operator *, the plugin can replace all font names with the specified new name, e.g., Arial. All name mapping operations are performed entirely within the exported content, so the original Figma names are not affected. The JSON keys on the left side represent the initial exported names, and the values on the right side represent the new names. Therefore, it is necessary to export the unit once without any name mapping to extract the initial names. Based on that, the JSON structure can be manually generated. When utilizing the name mapping feature, it is strongly recommended to select the Embedded Wizard type + Figma ID option for both Naming of Embedded Wizard unit members and Naming of Embedded Wizard class members. This ensures that the names remain consistent, even if the design is altered.
A detailed example of a successful name mapping operation is provided in the illustration below. In this example, unit member names and font names are adjusted to align with the desired naming conventions and installed fonts. The name mapping feature allows for renaming unit members, class members, and font names withing font resources. For instance, the class MyClassXyz was renamed to Ristretto, and the font name Bebas Neue was renamed to Bebas Neue Regular.
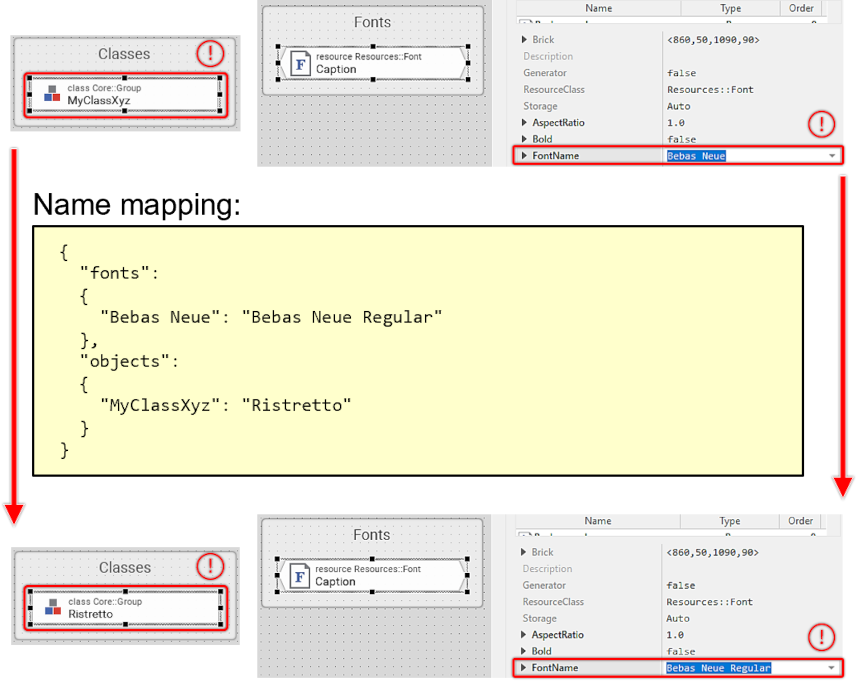
Name mapping.